MEGAJOLT IGNITION SYSTEM
by Bob Maassel
TRA Technical Director Comments:
I’ve been watching Bob slowly modify his car over the last few years, starting with MegaJolt and Toyota transmission additions, but the EFI system I saw this year at Kenlake just screamed to me, “get Bob to write an article about this.” Thankfully, Bob has been documenting his MegaSquirt installation, so what follows is the MegaSquirt saga in his own words.
This is not for everyone – Bob is pretty adept at mechanical and electrical modifications – so don’t think you’ll be able to whip this off over the weekend. But to those who want a more efficient drive train and one that allows you more tailoring of the fuel delivery than setting jet size and needle profiles, this could be a way to go – Bob is blazing the trail.
I also don’t suggest this for a Concours car since I don’t think the TRA Judging Manual covers this quite yet <smile>.
Introduction
Back in 1972, I attempted to drive my TR3A from my home in Fort Wayne to Carlsbad Caverns in New Mexico but only made it to Tulsa and had to turn around because the generator quit. I drove back home on just the battery. Fast forward to 2000 when I retrieved my TR3A, in boxes, back from my uncle (another story), and started doing research on what others were doing to restore/modify their Triumphs while I was reassembling mine. Some of the more popular mods were alternators, Pertronix ignitions, and Weber carbs if your pockets were deep enough. All seemed designed to correct a real or perceived deficiency.
With the lack of Carlsbad memories still haunting me, I installed an alternator first thing and got negative ground as a bonus. Over the next 10 years, I replaced parts as needed, sometimes stock and sometimes not. Non-stock items so far are alternator, homemade spin-on oil filter adapter, “turbo” muffler, electric radiator fan, rack and pinion steering, Megajolt ignition system, Facet fuel pump, all electric gauges, TR6 overdrive transmission now replaced by a Toyota 5-speed conversion, wood rim steering wheel, homemade heater box, geared starter, partial TR6 front suspension, and TR4A intake and exhaust manifolds.
Megajolt
The Megajolt ignition system is an offspring of the Megasquirt fuel injection technology, so I became familiar with both when I did the Megajolt modification. Megajolt requires a toothed sprocket on the crankshaft, and the one I used was from a Ford Escort. To use this as unmodified as possible required changing to a serpentine belt. Once I did that, and since fuel injection was something I had been thinking
megasquirt
Because of the cost, I didn’t want to put Weber carbs or a supercharger on my car. I wasn’t really interested in more performance as much as consistent performance tuned so the engine could join the Army and “be all it could be,” so fuel injection seemed like the next logical step. I first bought an Innovate wideband O2 sensor to establish a baseline and see if I could tune the SU carbs better. I had noticed the tailpipe was always black from running too rich. Ideal is a 14.7 to 1 air-fuel ratio, and the O2 sensor generally showed about 13 to 1 or less, and I could not get it any leaner than that even with new needles, jets, and the mixture nuts all the way up.
I had decided to go the Megasquirt route about 1-1/2 years ago, and I wanted to know how lean a TR3 could be reliably run. Due to circumstances, I could not start this project until late 2012. I had all this in mind when I installed the TR4A intake manifold earlier as this is what I wanted to modify to accept the injectors.
I saw one picture on the internet of a TR4 with Megasquirt but with no additional info, so I knew this would be uncharted territory, at least for me. I decided early on that I wanted to do a full sequential injection and ignition system, so I ordered the Megasquirt kits with this in mind. You can start with throttle body injectors that are ignition triggered to simplify things and then upgrade as time goes on, but I wanted to go full sequential first off, like all modern cars are now.
My job currently requires me to be in Indianapolis during the week, so I used the time there to assemble and test the Megasquirt. All the mechanical work was done on weekends at home. For full sequential, you need to know when a cylinder is on the compression stroke as opposed to the exhaust stroke. That info usually is from a cam position sensor, and since the distributor is driven from the cam, it can be used instead. I took everything out of the distributor except the shaft. I bored out a ¾ inch diameter by about 2 inches long aluminum rod to fit the shaft and fastened it to the shaft with a set screw and the original screw that held the points cam mechanism in. I drilled and threaded a ¼ x 28 hole near the top and screwed in a section of a bolt so it protruded from the side about 3/8 inch and sensed it with a Hall sensor to give cam position. The toothed wheel on the crankshaft for the Megajolt I had installed earlier was retained with no further modification.
The next job was to modify the TR4A intake for injectors. I bolted the intake manifold onto the side of a length of large angle iron using the head end dowel pin holes. When the angle iron is placed like an upside-down “V,” it positions the manifold at 45° so that the head end is down and the carb end is up. I used progressively larger bits in my drill press to make ¾ inch diameter holes very near the head end by the flange. The injector bungs were purchased online, and the inside is already pre-machined for standard 14mm injectors. You just cut them to length and weld or epoxy them in place. I used aluminum “welding” rod I bought many years ago of the kind often shown at car shows and swap meets closing up holes in pop cans and small aluminum engine parts. You can Google Muggyweld or Durafix. The rod melts at a lower temperature than the aluminum parts do, so it is more like soldering or brazing in that respect. I didn’t want to epoxy and didn’t want to pay for TIG welding.
I bought a 14-inch length of fuel rail and a 17/32 drill bit and made a fuel rail to match the spacing of the holes in the manifold. I researched fuel injectors, as going too small or too large are equally bad. There are a number of online calculators for this. I ended up with a Bosch 0280150901. These are used on early 90’s GM 3.8 V6 engines, so they are common enough. They flow 18.55 lbs. per hour, which is close to what a TR3 engine needs. Too small and you lean out at high RPM and burn pistons. Too big and you can’t adjust the open time short enough to avoid flooding the engine at idle.
I did some math, and the total area of 2 SU carburetor throttle plates is slightly larger than one 62mm throttle, so I went online and found an inexpensive 62mm 97 Honda Accord throttle body. Same as the injectors, you don’t want it too big or too small, but for different reasons. I also bought a Honda Throttle Position Sensor (TPS) for this throttle body. I was looking for a throttle body that used a cable and had a progressive pulley so that the effective diameter changes as the throttle opens, making it less touchy just off of idle.
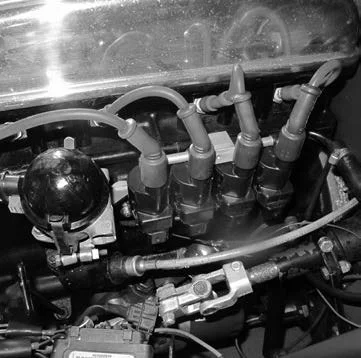
Since I was going to do full sequential on both injection and ignition, I decided on using 4 GM LS2 spark coils. These are 5-volt logic triggered and do not require any special circuitry in the Megasquirt. I also found these online. I made a bracket that bolts to where the original coil went to mount the coils on. Plugs are yttrium tip, gapped at .050 inch, which are the same ones I previously used for the Megajolt.


The “36-1” toothed crank wheel is from a Ford Escort 1.9L engine and was very easy to modify for the Megajolt ignition system. The downside is that it is for a serpentine belt. I wanted to change from the ¾ inch belt anyway. I had to make a water pump pulley to fit the serpentine belt. Moss has a similar replacement water pump pulley for their supercharger kit, but it was about $150, purchased separately, so that wasn’t an option for me. The alternator pulley you can buy. I had done this modification in 2009, so it saved a lot of time. You can also buy a 36-1 tooth wheel and weld or bolt it to your existing pulley if you want and skip the belt mods.
I bought a 4”x4” by 14” long square aluminum tubing with a ¼ inch wall thickness from Metals Supermarket for the plenum. It is bolted from the inside to the intake manifold where the carburetors would normally go. The theory is that it should be equal in volume to two or three times the displacement of the engine. The engine is around 130 cu. in., and the plenum is around 170, but this was the closest I could fit in the engine compartment. The end plates are 1/4 inch thick with the front one machined to mount the throttle body on. It is all screwed together with stainless steel hex drive screws. I wanted idle control, so I bought a 2”x2”x3” piece of aluminum and bored it out to adapt a GM Idle Air Control (IAC) valve to mount to the bottom of the throttle body where a Honda valve would normally go. Other sensors are coolant temperature, which is mounted in the thermostat housing, and intake air temperature, mounted in a threaded bung that was epoxied to a hole I drilled in the throttle body.
I ordered wiring at the same time as the Megasquirt kits. Each wire is labeled and color-coded for each function, making it a lot easier to keep track of. Once all of the hardware was positioned, I could cut the wires to length, install the ends, and then form them into bundles. Much of the online information alluded to the fact that you must route the sensor wires in such a way to avoid picking up electrical noise from other wires. To that end, I routed the injector wires and the ignition wires each in their own bundle. The sensor wires each have grounded shields, and they can be run together. All the return grounds and shield grounds go to a common point and then to the Megasquirt ground.
There are a couple of test boards you can optionally purchase, called JimStim, to test most of the functions of the Megasquirt before it is even installed in a vehicle. They plug into the Megasquirt where the wiring harnesses would normally go. It has potentiometers you turn to simulate things like coolant/air temperatures, O2 sensor output, and throttle position. It generates crank and cam sensor pulses also. You plug it in and then watch the results on the TunerStudio software. This software is then used to tune the Megasquirt to your particular engine.
The other things I worked on at home on the weekends were to plumb a new fuel line from the tank to the high-pressure pump and filters to the fuel rail at the engine. The existing line is reused as the return line from the fuel pressure regulator. My fuel tank had a drain plug installed from the factory, I presume, that had never been removed since the car was new. I drained and removed the tank to better see what I was doing. After removing the drain plug, I saw that the thread size was 5/8-16 and by chance, so is a 3/8NPT except it is tapered. I rethreaded the hole for a pipe thread and put in a shutoff valve followed by a TEE to connect to the fuel pump. The TEE lets me retain the draining function. The fuel pump is a Ford external pump used in 80-something vans and pickup trucks. I put in a pre-filter to protect the pump and a high-pressure filter after the pump to protect the injectors.
Since my TR3 had the bulkhead cover plate on the right side that covers the hole where the brake and clutch master cylinders would go on a right-hand drive car, I made a similar plate and mounted the Megasquirt ECU on the passenger compartment side of the plate as it is not made to stand up to heat of the engine compartment. Then, I ran all the wiring into the engine compartment using a 22 conductor Weatherpack bulkhead connector.
Once all the wiring, plumbing, throttle linkage was connected, the only left was to try and start it. You cannot start with what is called a blank Tune. You have to go through every setting in TunerStudio and make changes specific to your particular setup, following logical steps before you can attempt a start. Having done all this, I was able to attempt a start and did get it running the first time but it would not idle. As far as fuel goes, the most important table in Megasquirt is the VE table. VE stands for Volumetric Efficiency. The data is in a 16 by 16 matrix form that represents injector pulse widths at particular RPMs and engine loads that Megasquirt uses to try to stay at the required air-fuel ratio. There is also a similar 16 by 16 table for ignition timing with the same X Y axes as for fuel but the data represents the actual ignition advance values. This table is best tuned on a dyno but I just tried to emulate the published TR3A advance curves.
Back to fuel, with the engine and TunerStudio running it is easy to see what part of the VE table Megasquirt is currently referring to and you can make changes while the engine is running and see if you are doing any good or not. If you opt for and pay a nominal fee for the registered version of TunerStudio, it has a function called VE Analyze that will auto-tune as you drive. With the engine running as long as I held the throttle down a bit I turned on the VE Analyze and saw I was running lean and that the numbers in the table should be closer to 60 instead of 30 like they were around the idle area. I shut the engine off and changed all the idle area data to 60 and restarted the engine and it would finally idle.
Eventually, by watching the AFR gauge and tweaking the table, I was able to drive it around the block. I turned auto-tune back on and went for a longer drive and let it do its thing. This was pretty much all I had time for before I attended the 2013 TRA convention in Kentucky. I still have warm-up issues as it tends to bog down a bit when you punch the throttle when cold and have been working on that as time permits.